Making a Necklace
Because I am somewhat challenged in the area of loading pictures, the pictures below are displayed from end to beginning. Be sure to look at them from the bottom to the top if you are trying to make sense of my directions.
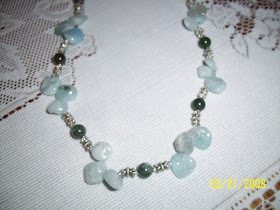
8. The finished product
7. Drip a drop of glue onto crimp
6. Repeat on second end. Pull until nicely tight, but not too stiff.
5. Wrap wire around clasp ring and put back through crimps and beads. Using crimping tool, crimp them down onto wire.
4. String your crimps and then your clasps
3. Length is a matter of preference
2. String your beads once you have decided on your design
1. Place your beads and play with design ideas
A bead board can be handy
Jewelry making supplies
Well let's just say I am a little bit behind this week in posting my project. But as it is still "this week", I haven't completely failed in my attempt to post a project a week. I decided to make jewelry this time around, and will post several pieces as a part of a series. I thought this project, and the next several might come in handy for Mother's day, and give a few ideas for Mother's Day presents. My Mom is the one who taught me how to make jewelry and got me addicted to it in the process; so I will have to come up with something else to make for her for Mother's Day. (Thanks Mom, I miss having you here to make jewelry with).
Jewelry making is a fun project that all the kids will start gravitating to when they see all the supplies out. I have often asked our kids "Do you want to make something with me?" and they will reply "No thanks". But a short while later they will be sitting there with me sorting through the beads and planning a necklace. Even Russ and Eddie have had fun making a boy's Heshei necklace (I am not even sure how to spell that (its pronounced Heeshee).
Jewelry making is a fun project that all the kids will start gravitating to when they see all the supplies out. I have often asked our kids "Do you want to make something with me?" and they will reply "No thanks". But a short while later they will be sitting there with me sorting through the beads and planning a necklace. Even Russ and Eddie have had fun making a boy's Heshei necklace (I am not even sure how to spell that (its pronounced Heeshee).
For this weeks project, we'll begin with making a necklace.
Supplies Needed:
Almost anything you need can be found in craft stores such as Michaels, or Hobby Lobby, and even Walmart carries quite a few supplies. Or you can order on line, just google jewelry supplies.
Basic jewelry making tools: pliers (needle nose type), wire cutters, scissors, crimping pliers, Jewelry tweezers.
Softflex beading wire (fine gauge for the smaller beads, medium or large gauge for the big stones).
Beads and findings (findings are any variety of the metal beads, clasps, hooks etc. that you will need)
out of which you must have the following for a project
a). Crimps
out of which you must have the following for a project
a). Crimps
b). Clasps or Toggles
Jewelry Glue (this is like crazy glue and can be found with the jewelry making supplies).
You'll need a nice flat work surface, with a piece of cloth that will keep your beads from slipping around. Or you can use a bead board which is wonderful for measuring your necklace lengths, holding your beads nicely in place, and sorting what beads you are working with. I use both. You can find these in Jewelry supply stores as mentioned above.
1. Decide what length of necklace you would like to create and then cut a piece of wire approximately 2 inches longer than you would like it to be when finished.
2. After you have picked out a variety of beads to work with, begin playing around with a design: This is my favorite part. I can spend hours playing with designs, and often have several necklaces lined up waiting to be strung and finished all at once.
3. Now begin stringing your beads. I always begin in the middle and work out on both sides at the same time, in order to better insure continuity and consistency on both sides. Always double check your pattern, to be sure you have repeated the pattern correctly on both sides. I have left off a bead on occasion by accident, and this is very frustrating when you have crimped and finished your necklace.
4. When you have finished stringing, place 2 crimps on each end and then each side of your clasp or toggle.
5. Wrap your wire around the clasp ring, and back through the crimps and back through the several beads.
6. Crimp your crimps down with your crimping pliers.
7. Repeat on the second end, being sure to pull your wire tight ( not too tight, but enough to ensure excess open space is removed before you crimp, then crimp).
8. Glue crimps with jewelry glue as an added strength to the necklace.


I am so addicted to your weekly craft posts mom! The necklace you are making in these pictures is gorgeous!
ReplyDeleteThank you for your YUMMY comment on my blog! Your comments are the best!!!
Missing you this last weekend. Can't wait to catch up on the phone ;)
Thanks for using our wire to string your designs. They all turned out great!
ReplyDeleteHi,
ReplyDeleteI saw the Softflexgirl's post on Facebook and was intrigued by the name of your blog. I'm glad I came, and I compliment you on a lovely blog!
God bless you today!!
I like how these jewelry making helps me and my family earn a living.
ReplyDeletejewelry making supplies