Supply List :
Clear glass Christmas Bulbs (both the frosted and clear work well)
Acrylic Craft Paints (I used all metalic colors)
Rubbing Alcohol
Paint Brushes or Paint Sponge Brushes
Old Tooth Brush
Eye dropper
Clear Acrylic Spray
Fabric trim and Beaded trims (The fabric department of Hobby Lobby or Joanne's, has wonderful trims of every sort... I also bought up all cheap little grab bag scraps, because each bulb takes only a little).
fuzzy yarns
beads and bead making supplies (including Jewelry wire, pliers knitting needles for wrapping wire into corkscrews and ornamental designs)
Other Supplies for optional paint designs:
Cheese Clothe
Natural Sea Sponges
Rubber bands
String
Wire Mesh
Mesh Bath Pouf
Hair Comb
Plastic Wrap
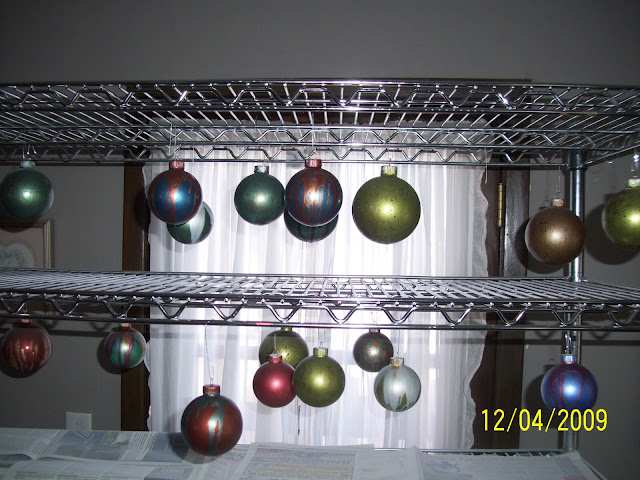
To begin, you will want something set up to hang your wet painted bulbs on so they can dry. When Himilce and I first made these, we used old hangers and opened them up and hung them up everywhere. It was a big mess, but it worked, and we had fun, although a few were broken here and there because it wasn't the sturdiest contraption, and we had to run around putting newspaper underneath them so they wouldn't drip onto the surface they were hanging over. After I decided to make a lot of them, Steve let me use his Shop Shelf Unit that was made of metal rungs, and I could hang dozens of them up at a time. I placed newspaper on each shelf so that they would not drip on each other.
Next, I put newspaper down on my work surface and began painting. Generally speaking, I did most of the bulbs the way I am describing in the following steps, but you can let your imagination kick in, and believe me once you begin you will have all kinds of ideas come to you.
Step One
Paint entire bulb a base color so that it is completely covered
Step Two
While bulb is still wet, spray or drip, with an eye dropper, a second color that has been watered down so that it runs quite easily. You will want to spray or drip these paints at the very top of the bulb and let them run down. If paint does not run down the bulb readily, spritz it with water and it will begin to run. Consider adding a little more water to the paint you are spritzing with to make it run easier. You may add a third color at this time if desired.
Step two, other options
Allow first coat to dry, and using various texturing techniques, apply a second and or third color. You may use a sponge, or a mesh or wrap bulb with string or rubber bands, and apply another coat over the rubber bands or string. You may use the comb or plastic wrap to apply various textures with second color. You may drip alcohol over the wet paint or spritz the alcohol over it for a wonderful technique, or you may splatter paint with a toothbrush. You may also squirt paint in variety of colors on the inside of the bulb, and I did a few like that. They turned out pretty, but the paint often ran together and almost mixed as one color. Also you have to be sure to put them upside down in an egg carton to make sure they have all they extra paint out of them so they can dry.
Step Three
Hang bulbs up and allow paint to dry several hours to overnight.
Step Four
Spray clear acrylic spray over bulb to seal paint and allow to dry a couple of hours so that they can be handled.
Step Five
Using a hot glue gun, glue embelishments of trim, yarns, beads etc, around top and (if desired) around the bottom of bulb.


Hello My Sweet Friend.. : )
ReplyDeleteI am so happy to be back and have dearly missed visiting with you...and what a BEAUTIFUL day to start up again...Those Ornaments are Stunning...My favorites are in pictures..5,8,and 10...I think that's about all of them isn't it..you did such a lovely job and I am sure they were and are Treasured gifts...
I do pray you had a wonderful and blessed ThanksGiving Celebration..with your family..
Much Love to you and Hugs..from me..
In Christ
Angelina
I just love these ornaments mom. I have mine hanging on our tree as I type. Loved seeing pictures of Himilce. Missing you so much!!!
ReplyDelete~ Marie
Mom I am so happy you got the blog fixed! It looks beautiful! :D Jon and Marie must have helped fix it :D Or maybe you figured it out! I love you!
ReplyDeleteYou and Dad have a nice weekend! :)
That is so funny! I thought I left a comment about your beautiful bulbs! And I just scrolled up to look and I didn't!
ReplyDeleteThe bulbs are soooo pretty Mom. I am bummed because my bulb is in Ohio hanging on Marie and Jon's tree lol! :D I need to swipe it from them ;)
Those aren't your bulbs Eliza, they are ours along with the red bowl
ReplyDeleteHe he he he