

When we were painting our kitchen cabinets I decided I wanted to do something fun to the inside of my cabinet doors, and came up with an idea to decoupage inside of the door with wrapping paper. I went to Hobby Lobby and picked out some wrapping paper that I liked, some Mod Podge and brushes and went to work.

I decoupaged all of the insides of all of the doors….
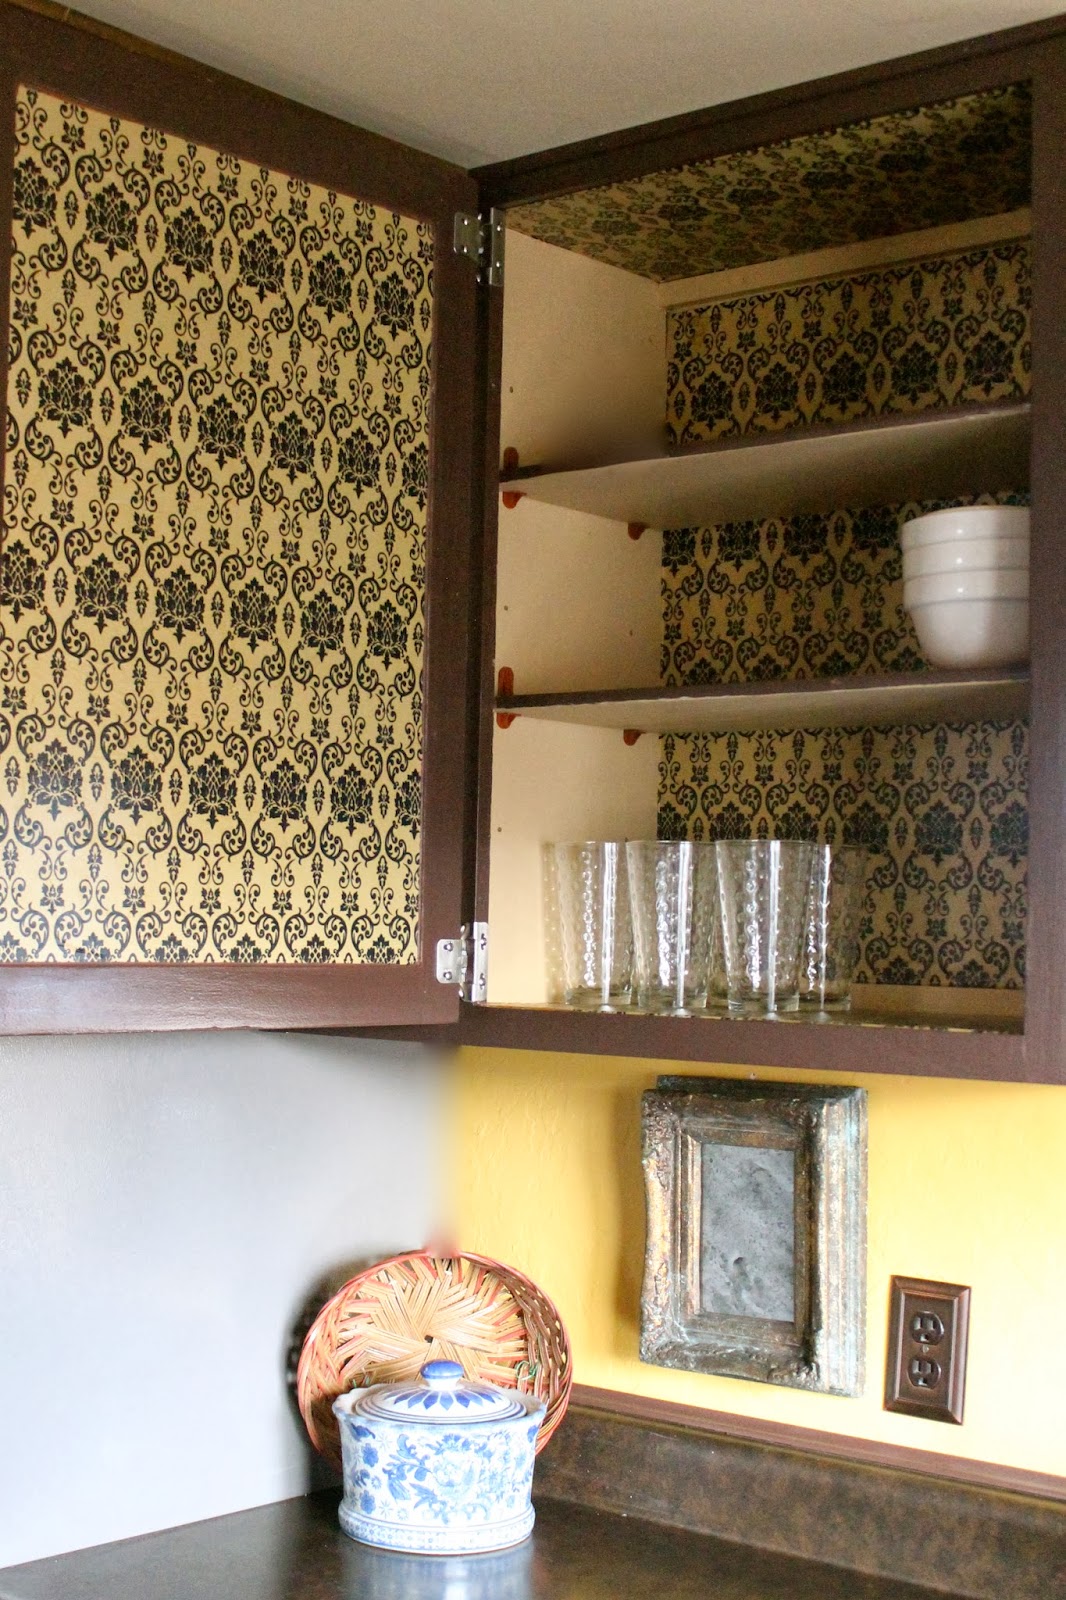
and decided I wanted to do the back, bottom and top of this cabinet as well.
It needed something on the inside to help transform the ugly plywood. The other cabinets are either down low, or have lazy susans in them, so there was no point changing anything inside them. But this one is the most used and open to public view, so it was going to get a little make over.

1 roll of wrapping paper of choice.

Take measurements of your doors and cabinets and use a yardstick to measure and draw your measurements onto the wrapping paper.

Cut out your pieces.

Put some Mod Podge onto your surface nice and thick. Apply the paper on top of it and smooth it down nicely. When you are using wrapping paper, it will tend to wrinkle easily. You can buy a roller to help smooth it out; which I didn't do… I didn't really mind the minor imperfections, to me they added an antique sort of charm. You can also use fabric instead of paper, which will be a little easier to manage in terms of straightening out the wrinkling affect.

Pour and brush the Modpodge over the top over the paper. Make sure all is completely covered.
When it dries, you will not see all of the lines and brush marks.

For the inside of the cabinet, I first painted the sides and inside frame work.

Then I got out a paint roller. I poured the Mod Podge into a paint pan and rolled the sponge roller in it.

Roll it onto the cabinet quickly and as thick as possible.

When putting on the paper on a large area such as the back or top of a cabinet, roll the Mod Podge on half of the surface first, then apply the paper half at a time. Add the Mod Podge to the rest of the surface and finish applying the paper; this makes the paper a little easier to deal with. Apply the Mod Podge to the top of the paper.
If you are going to use the surface to put anything on, it is good to do a second coat of Mod Podge once the first is dry. I painted Mod Podge on the surface of the paper, and also onto the painted sides, It was easier than trying to avoid it, and It helped me thoroughly drench the corners and nooks with Modpodge and not feel worried about getting it on the paint coated areas. At first when you have the Mod Podge on everything, you are thinking "this looks terrible," but in 15 to 20 minutes, it is dry, clear and not showing any of it. It looks smooth and nice.

Steve put some calking on the inside of the framework of the cabinet door to tidy up where the paper meets the frame work.


Other ideas for the inside of the cabinet door.
- Paint in the inside a contrasting color to the outside of the cabinet (Here's how my daughter Marie's cabinets looked when she did this)
- Decoupage with fabric,
- Cover with contact paper.
- Paint with Chalkboard paint: you can write notes and lists on it.
- Cover with Corkboard: you can pin notes and pictures to it
- Cover with Wainscoating.
- Paint a stenciled design
- Decorate with Vinyl wall art
- Decoupage with lace.
- Use Washi or Decorator duct tape to cover or create a design.
- Cover with Wallpaper.
- Remove door to create an open cabinet and paint as number one on this list.
My word Mom! It looks AMAZING! And you made it look so simple!! My creative juices are flowing now!! Especially the part about picking out wrapping paper! I can't wait to see it real view in a few weeks!!! I love you!!!
ReplyDeleteOh, I think that looks just beautiful! What a wonderful idea!
ReplyDeleteWe are enjoying some more of your fall trail mix today! The whole family was so excited when they saw me starting this last night!
Hope you have a grand day!
Oh, thanks Keri, you are always such an encouragement in my day. Love that you are enjoying the trail mix.
ReplyDeleteWhat a neat idea, so pretty, has me thinking. I want to paid t our cupboards but haven,t been brave enough to try it. Our cupboards are from the early seventies when the house was built they are lamenat so not sure how they would paint. Need to do some research. Have a good evening. Joyfully,
ReplyDeleteCheryl
Hey Cheryl, I think your lament would do fine if you use "Bullseye" Primer first. Its great stuff and makes all of it "do-able".
ReplyDeleteOh wow Pam! That looks amazing! I never would of thought to modge podge the cabinets. What a great creative way to cover up the insides.
ReplyDeleteYou go girl! Keep inspiring me!
Hugs,
Amy
Hello Pammie, It looks so rich and elegant! I think you're on to something! I think it is really fun to experiment and jazz things up a bit! This really was a very cool idea! When I get a chance I need to think about this for my cabinet door backs in the kitchen!
ReplyDeleteYou did a great job explaining it also. Hey I am still trying to get to the tea cozy from last year :)
Blessings! Roxy
I have been eyeing this idea too. It does add such a nice touch to the kitchen. Yours looks perfect!
ReplyDeleteI do like Marie's too. The contrasting color is really nice.
I like your chalkboard idea. I love chalkboards and have had fun spray painting chalkboards here and there around the house. Fun ideas!
~Cinnamon
Your cabinets came out so beautiful! I love how it makes the glasses stand out!
ReplyDeleteJust discovered your site and I love it! and What an amazing job you did, it's just beautiful!
ReplyDeletePine Kitchen Cabinets
Kitchen Cabinet Planner
Thank you Genny.
Delete
ReplyDeletewow what a great impressive post you got here i am very glad to you.
sửa chữa tủ bếp bị xệ
sửa chữa tủ bếp mối mọt
sửa chữa tủ bếp bị mối
sửa chữa tủ bếp bị mọt
Thanks for sharing such a amazing post..very nice info.
ReplyDeleteWe offer cabinet doors in a wide variety of styles and colours, and we perform custom colour matching so any new cabinet doors you get can perfectly match your kitchen décor.
Stone Countertops Winnipeg
custom cabinet doors ontario