

As I mentioned on my last post, I went on a tea cozy Marathon last Spring with my friends Roxy and Amy. I had fun making several tea cozies for gifts. I had taken several pictures, and have wanted to post this for a while, but it took me a little time to finally put this post together. A Tea Cozy is a cozy thing…. yes, a beautiful and cozy thing. They are on my list of favorite things, and I have loved learning to make them; I thought some of you might feel likewise. I made my first tea cozy for my mother-in-law for her birthday about 13 years ago. I was very proud of myself when I had made it, because I didn't have a pattern, and didn't really know what I was doing. I had a pretty piece of material and went to work, and it actually came together very nicely.

I have made many since then for gifts, and for myself and even did a couple tutorials in the past that I posted. I decided to post this updated tutorial and will also leave a link to a very nice video that I found on "You Tube", with instructions by Debbie Shore. It is a wonderful tutorial, and I think you will really enjoy Debbie.

One piece of brown paper or tissue paper for a pattern
1/4 yard of fabric for outside (this is an approximate, depending on how big you want your tea cozy)
1/4 yard of fabric for inside lining (approximately)
1/4 yard of batting
Trim of lace or rick rack for a tab or for decorating. I used the tea dyed lace I had made a little while back.
Instructions:
- To begin, you will be making a pattern as follows:
- Decide the size of tea cozy you want :
- You can do this by measuring your teapot

- For the width: Take your tape from spout to handle, allowing for the roundness of the teapot to be included in your measurement. Add an inch to accommodate for the seam allowance in your measurement. Write this down as the width.
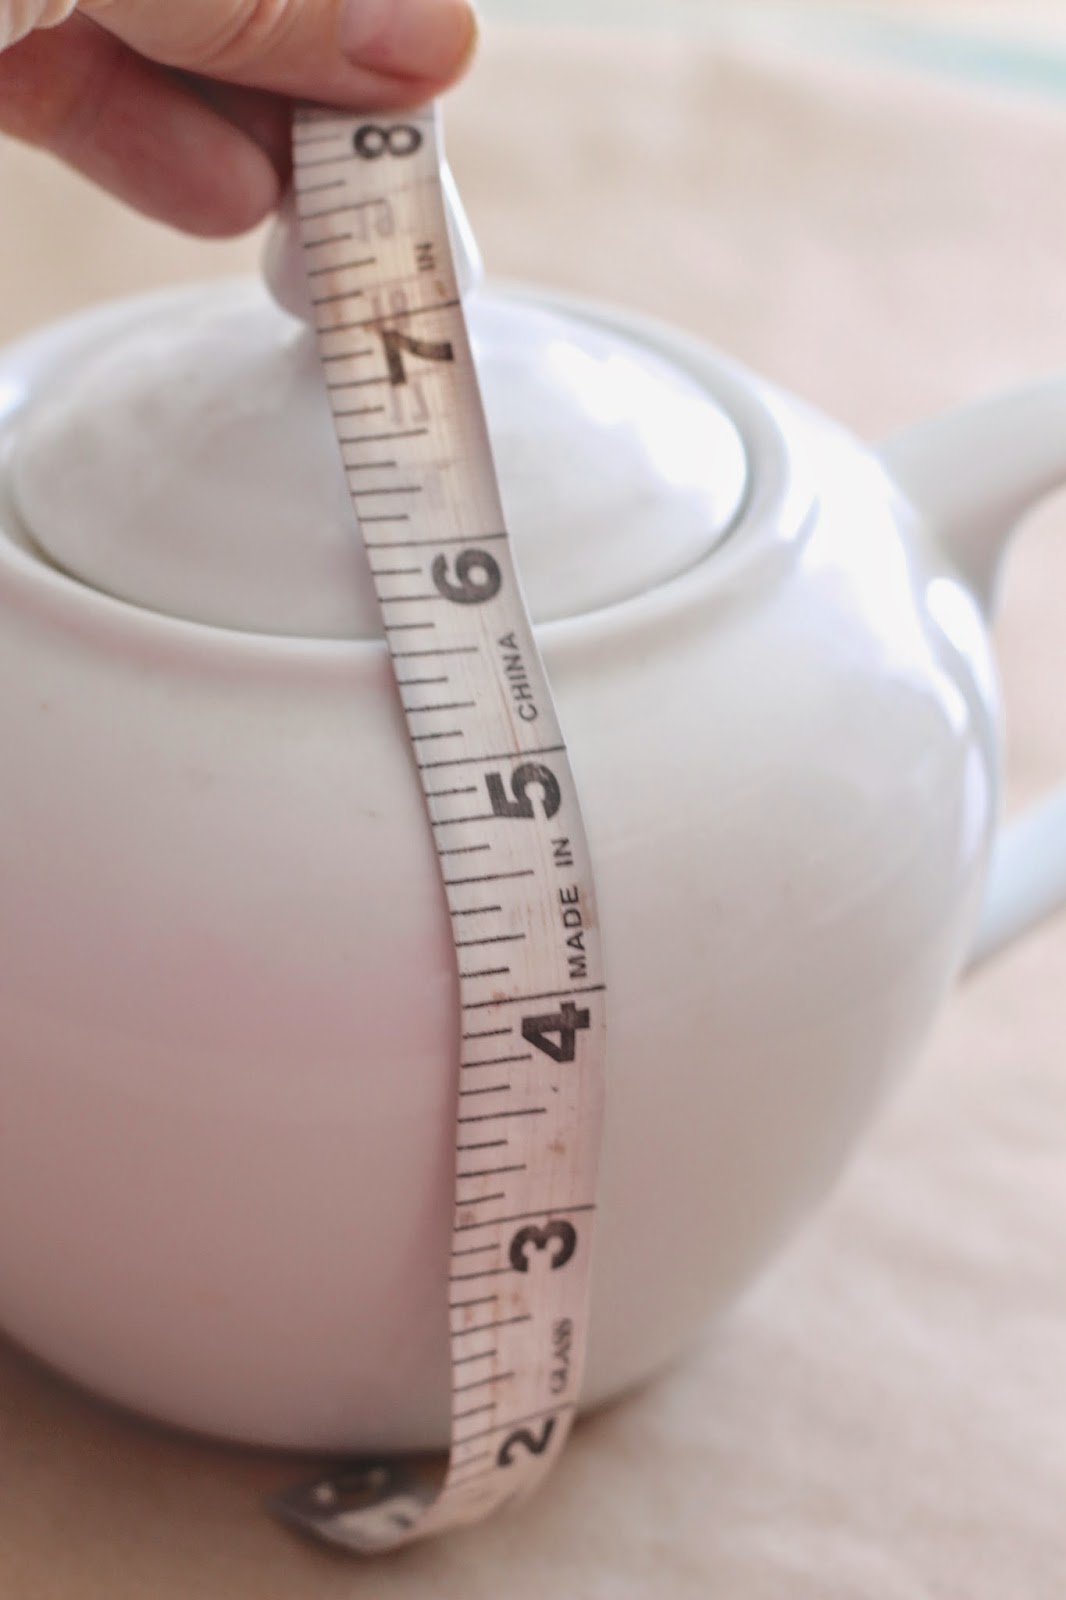
- For the Height: Measure from the bottom to the top of the teapot allowing for the roundness in your measurement. Add an inch to accommodate for the seam allowance. Write this measurement down as your Height.

- Draw and cut out a Rectangle with these measurements

- Trim the corners of the top of your rectangle to form a half circle. Remember that the width is wider than height, incase you are doubting which side is the top.
- This is your pattern. You can fold this pattern in half (from side to side) in order to make sure the sides and top curves are exactly the same; trim and adjust if needed.

- Using your pattern, Cut 2 from your fabric and 2 from your lining fabric and 2 from your batting.
- If you desire to add lace, or a variation to the look of the fabric, do it first before you begin sewing your Tea Cozy; scroll 3/4 of the way down the page for suggestions and instructions.
- Place one of each of the outer fabric and the inner lining "right sides" together.

- Add a piece of batting to each set and pin them all together at the bottom. You will end up with two sets, with three pieces of fabric on each (one for the outer cozy, one for the lining of the cozy, and one for the filler of the cozy).
- You are going to sew together these pieces at the bottom using the seam allowance that you allotted for.

- Sew the fabric together, remove the pins and open.

- Press open seams with an iron.
- Now take the two opened pieces and place them together (with the right sides together), matching the lining side to the lining side, and the outer fabric side with the outer fabric side.

- If you are putting a tab on your Cozy, lay it flat on the inside when you place right sides together.

- When putting these two pieces together, be sure to line up your bottom seams first.

It will look like this.

- Sew the two pieces together leaving 3-4 inches open on the lining side.

You can see the opening in the lining at the top of the picture.

- Turn the Tea Cozy right side around through the opening in the lining. Push all of the seam edges firmly to spread the cozy evenly open.

- Iron the bottom seams open.

- Tuck the rough edges of the opening inside the Tea Cozy.

- Press the edges with an iron.

- Be sure all is nicely matched and pressed together.

- Top stitch the opening close to the edge of the fabric.
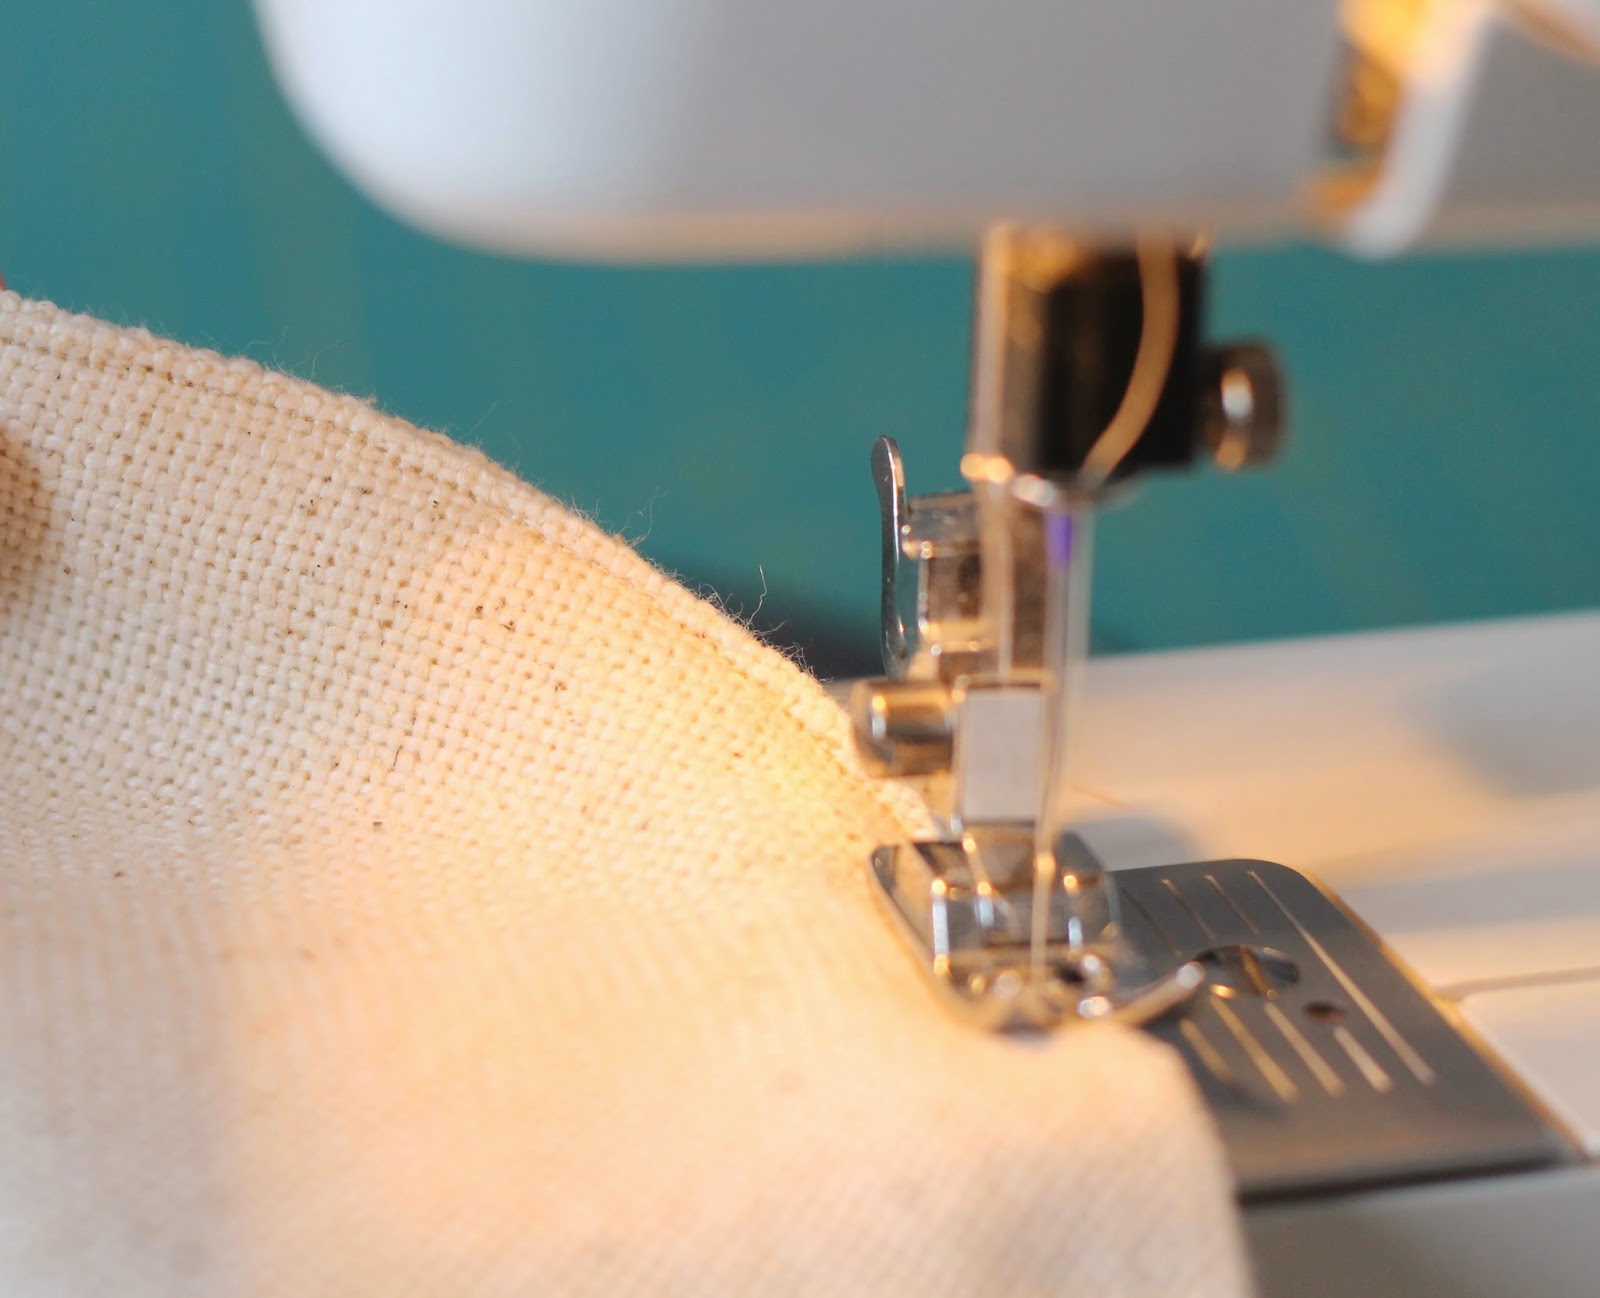
- Backstitch

- Push the lining into the inside of the Tea Cozy.

It will look like this now.

- Smooth and iron the edges.

- Iron the entire Tea Cozy. At this point, you can top stitch at the bottom to make the lining more secure if needed, or just leave it as is.

I made a variety of Tea Cozies with lace and had fun creating a few easy designs to change around the outer material; below are a few tips for designing or decorating.
Instructions for Design Variations
You can make a variation of pattern in your cozy by cutting different pieces of fabric and sewing them back together in a varied pattern to add an interesting design.

- Cut two of your pieces in an even cut at any point on the fabric.

- With right sides together, pin them and sew two different materials back together.

- Remove pins and iron open

- Trim with lace if you desire.

- Decide what looks best to you.

- Top stitch the lace to the fabric.

To make a tab:
- Cut out a little tab from lace or rick rack. Pin it folded down flat into the right side of the fabric.

- Sew it to the fabric. Keep it laying flat on the inside as you sew together your pieces.
- Now back to the top to finish putting your Tea Cozy together.


Yes, I know, that was a lot of pictures… but well, I couldn't seem to help myself.
Here is the "How to" Video by Debbie Shore;
I'm sure you will really like it.
Enjoy everyone, and have fun sewing.
I'm sure you will really like it.
Enjoy everyone, and have fun sewing.
Dear Pam, this was so well done, and professional quality! I also just love tea cozies! I have so many to choose from when years ago I had not even one. They all look so beautiful! As soon as the weather cools down I will also be doing a post on my tea cozies!
ReplyDeleteLovely I say: Just lovely...
Blessings, Roxy
What an amazing and satisfying post Mom!! You filled my love tank!! What stunning tea cozies!! I want to pin every picture!! Your detail is so helpful and makes anyone feel like they can do it!
ReplyDeleteI can't wait to be sipping a cup of tea with you and admiring one of your tea cozies…. :)
Hello Pam!
ReplyDeleteThese were so fun to make and create! I love that you have made a whole variety of these since our Sewing Day! You are one very talented gal!
Hugs,
Amy
What a lovely tutorial. Now I know what you were ironing:o) They are so pretty, need to find someone that drinks tea so I can make some for gifts.
ReplyDeleteI have a Christmas tea pot that my daughter gave me last year, need to make a Tea Cozy for it.
As always your posts are such a blessing.
Joyfully,
Cheryl
Beautiful!! I may have to twist your arm and ask if you'd like to donate one as part of a Giveaway sometime, over on my blog... when I host my "Mugs and Muffins".
ReplyDeleteNever hurts (for me!) to ask.. :)
These are really lovely!!
These are gorgeous , sadly I don't use a teapot:(((
ReplyDeleteThese are beautiful. I love the vintage look of them. I also made up some tea cosies as gifts a couple of years ago but they didn't look as fancy as yours!
ReplyDeleteHooray! I can't wait to make some!! Pinning this blog post to come back too... :)
ReplyDeleteThe pattern measurements didn't work for me - so I found another online. I found the width way too wide to make the pattern. But will use your instructions. Great colours!!
ReplyDeleteThanks for the comment Madeliane. Hope you enjoy the tea cozy... sorry the measurements didn't work out for you.
DeleteI don't sew, and math (seam allowances) makes my head hurt, but this tutorial is the most helpful I've found in my search. Thank you! My daughter and I hope to make a tea cozy this month for the sweet little pot we got for our poetry tea times. I'm glad you didn't link (that I saw) to an Etsy shop, or I'd have been tempted to buy one instead of trying to make one on my own. Thanks for your instructions, and wish us luck!
ReplyDeleteHi Courtney, thanks so much for your sweet encouraging comments. I don't have an Etsy shop going at the moment, but if I ever get back to it, I'll be sure to let you know. I know this project can look a little intimidating, but it is really much simpler than it looks, and you will have a wonderful time with your daughter as you create together. Would love to see a picture of it when you get it done.
DeleteI am in the process of starting to make the cozies. I am going to make both kinds. Went to HOBBY LOBBY for my material and can't wait to get started. I just finished making 9 microwaveable bowls.will have daughter put them on her facebook.will be watching the tutorial for the dome shape one. Thank you for good directions.
ReplyDeleteDolores, that is wonderful, I would love to see your microwaveable bowls; they sound great. Thanks for the comment and encouragement, I hope your tea cozies turn out well.
ReplyDeleteAmazing. What a very helpful tutorial. They are all very pretty.
ReplyDeleteThank you Deann.
DeleteYou have given me the encouragement to start, I make a lot of tote bags, sort of the same process. So thank you, I am starting today!
ReplyDeleteThat's wonderful, Helena. Thanks for the comment. I hope it all comes together easily... would love to hear from you when its finished.
DeleteThis has been pinned to my Pinterest for a while. Finally made the two cosies I needed today. I am by no means a sewer and very much a beginner. This is genius and it worked. So easy and they look great. I kept it simple yet still so happy with the end result and the best bit I didn't get stressed or swear once making my 2 cosies - thank you
ReplyDelete