


Shamrocks are fun little plants that are easily found every year about this time to kick off St. Patrick's Day. Whenever I see them in the grocery store, I think of my Mom, who like me, finds them irresistible and often can't help adding another one to the collection we both already have at home. There are several types and colors after all, so its not as if you are buying an identical plant to the one you already have. Besides, B.C. our cat has recently found where I keep my shamrocks (safely out of her reach supposedly), and, having a terrible addiction to them, she has eaten the heads off of them and left them all a little bald and they look very sad. A new one would definitely ease over the ugly period of the other until it has grown back.
Even though I am neither Irish nor Catholic, I do enjoy a little St. Patty's day right along with the rest of America. At our house we usually have our corned beef, cabbage and potatoes (I recently heard that this meal is not necessarily an Irish meal; although where we got this tradition from I do not know, did someone just make the whole thing up? Who can say. No matter, it is Irish enough for us.) We also often love to watch "The Quiet Man" with John Wayne and Maureen O'Hara; if you haven't seen that movie it is really a fun one and suites well on St. Patty's Day.
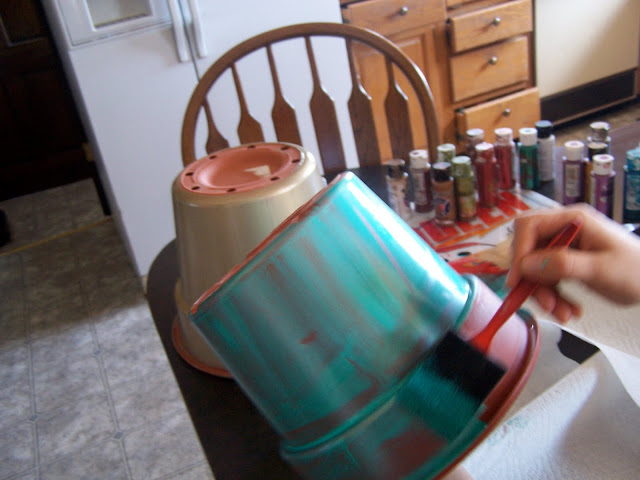
This week, to celebrate, I wanted to do something with shamrocks, and decided that I would give some of my clay pots a make-over and plant my newest Shamrock in one. Olga helped me in the project and we have had a good time painting and decorating together. These pots are fun and can be used in more ways than just flower pots; they can be used as gift baskets (containers), to package anything from garden related gifts, to gifts for the gourmet or artist or for the tea lover. They can also be used in the bathroom for tooth brushes etc. or the bigger ones for hair and beauty supplies; Use your imagination.
My Instructions will improve in the future but for now this is going to have to be as good as it gets:
SUPPLIES NEEDED:
one or two old pots
sponge paint brushes
Acrylic Craft paints (I used the metallic paints)
Wrapping paper or tissue paper (a pattern which you really like
"Mod Podge"(A glue used for decoupage found in a craft store)
Any fabric trims, including beaded trims or any variety of frilly thing you like.
Clear Coat Acrylic Spray
Hot Glue Gun
INSTRUCTIONS:
1). Wash pots thoroughly.
2). For painted pots, paint with color of choice.
3). Allow to dry then apply a second coat. Allow to dry again.
4). Now the fun begins. Your imagination can kick in with splatter techniques, (accomplished by using an old tooth brush, dipped into a contrasting color and using your finger, dragging it over the brush and letting it fling paint onto to your surface. You may also drip another color, which has been thinned with water, over the pot. If you desire the dripping color to drip a little more loosely spray with a spray bottle of water over the wet dripping paint, this will cause a nice affect. Sponging a contrasting paint, also gives a nice affect.
5). Now let your pot dry over night.
6). When it is thoroughly dry, spray it with your clear coat. Two coats of this gives the nicest affect and seals it against moderate moisture.
7). Choose a trim; Use a hot glue gun to glue the trim around the brim of the pot.
INSTRUCTIONS FOR A PATTERNED DESIGN:
1). Find a piece of wrapping paper or tissue paper that you like.
2). Cut it to match the width and circumference of your pot.
3). Using your sponge brush, paint the underside of the paper with "Mod Podge"
4). Place the paper around the pot.
5). Smooth the paper firmly around the pot. In places where the paper would tend to crinkle, gently allow it to fold over it self, as if you were wrapping a present. The Mod Podge will allow you to move the paper in place and it will stay. You will want to move quickly so that it doesn't stick where you don't want it to. Don't let perfectionism get to you while doing this, it looks really nice with the folds tucked neatly here and there. When in place run your hands over the entire pot, smoothing as you go.
6). Now spread Mod Podge over the top of the entire pot, completely covering the paper with a thick quantity.
7). When paper is completely covered, allow to dry several hours, until it becomes clear and hard.
8). Glue trim or beds around ridge.


